Hardware for Closewasher Hot and Cold Water Hookup at Kitchen Sink
New appliances are e'er a welcome addition to the household. They're designed to make life easier, fifty-fifty save you lot money and fourth dimension with updated, more efficient technology. Installing a new washing machine and dryer combo is no exception.
Larger home laundry appliances can be a little tricky, especially when it comes to how to install a washer and dryer considering of their bulky size and complicated requirements, but the benefits kick in well-nigh immediately once they're in place. To make the process easier, nosotros put together this installation guide with everything you demand to know near how to install a washing machine or dryer.
What Do Yous Demand to Install a Washer and Dryer?
Replacing a washer and dryer is an easy home improvement project. It should take an hr or 2 to install a washer and dryer if all necessary connections are ready.

Make sure you have the post-obit tools ready to be used:
- Record mensurate
- Utility knife
- Phillips and Flathead screwdrivers
- Pliers
- Adjustable wrench ready
- Wire stripper
- Tin snips
- A standard level
- Caulking gun and caulking
Washer and dryer parts to take on hand before installation:
- New washing auto and dryer
- Dryer duct and vent
- Vent clamps
- Dryer power cord
- New water intake hoses
- Washer drain hose
- "Y" Connector
- Gas flex line
Non all manufacturers will include installation parts and materials with a new washing machine or new dryer. When included in the purchase, these parts are oft stored in the pulsate inside the appliances. Earlier get-go your installation project, always bank check that yous purchased and received the correct appliance parts, such as the dryer power cord, dryer duct and vent, washer water supply hoses, or the drain hose.
Some measurements may need to be done to be certain the connections will reach without stretching or kinking, which could crusade unsafe vesture and tear on the machines. If needed, extension hoses can be purchased.
Earlier Installing a Washer and Dryer

In that location are a few things you can plan on needing to do before the new washing car and dryer are brought into the house. Before kickoff whatever projection involving the plumbing, always plow off the water valves well-nigh where you will be working. These are usually on the wall behind the washing machine.
Adjacent, disconnect the quondam appliances, after making sure that the tubs are empty, and that no favorite shirts will be snuck away when the erstwhile dryer is removed. Before moving the appliances, measure the distance betwixt the connections and the installation point to exist sure the new hoses, vent for the dryer, and electric cables will fit with the new washer and dryer features and supplies.
Disconnecting the washer and dryer requires unplugging the appliances from the wall. Empty any water from the washing machine supply lines into a bucket before removing them from the dorsum of the washer. Ever be sure to squad-move a washer and dryer using a mitt truck or dolly.
If you have a gas dryer, let the installer do the disconnecting to exist sure in that location are no difficulties with the natural gas line.
The other training is to measure the hallways, doorways, and stairways that the washer and dryer will have to be moved through. These measurements are expert to know then you can be sure that the appliances will fit non only at their installation point, just along the route between the delivery point and the new laundry room. If necessary, remove doors along the manner in order to be certain the appliances will fit without causing damage to the doors or nearby walls. Move furniture to clear the path as needed.
Plan to remove the commitment packaging in the driveway or garage, rather than bring it into the house. The boxes and other packaging materials will create a mess and be difficult to navigate around at the signal of installation.
Finally, assemble the necessary tools and supplies to take on hand.
7 Steps to Washing Automobile Installation
Once all the prep work has been done, it'south time to install the washing machine. Note that if the standard washer and dryer hookups aren't available, y'all accept two installation options:
- Connect the washing machine to a nearby sink.
- Install new electrical and plumbing connections in the space you intend to convert into a laundry area.
We look at both installation options hither.

Let's start with installing a washer with admission to built-in washer hookups. This installation is quick and easy to do with just a fiddling help.
- Prepare the Infinite.Clean the space where it will be installed and ensure the floor is level before placing the new washing auto.
- Remove the Packing Fabric. Remove any missed packaging materials or condom features. If there are carriage bolts fastened to the dorsum of the washing machine to continue the internal drum in place during send, remove them.
- Measure the Supply Hoses. Make sure the supply hoses will easily reach between the wall and the washing machine. If they don't fit securely, without stretching or twisting, buy longer hoses before moving ahead with the installation.
- Connect the H2o Supply to the Washing Machine. Exist careful non to overtighten the connections, as this stresses the materials and can crusade leaks. Attach the hoses to the machine showtime, making sure to match the hot h2o hose to the hot water line, and the cold water to the cold-water connectedness. Once those are secure, attach the hoses to the water supply valves on the wall.
- Adhere the Drain Hose. This connects to a standpipe in the floor or along the wall. If it doesn't reach, get an extension hose. If the washer will be used by connecting it to a nearby sink instead, in that location may exist a hose guide that will hold the hose in place, and so bank check your manufacturer's instructions to exist sure the hose guide is included.
- Plough the Water on At the Water Valves. Check the connections for leaks. Make sure none of the hoses or cables are twisted or trapped. Suit or tighten connections every bit needed but be careful not to overtighten.
- Level the Washer. Using the adjusting anxiety and a standard level, brand certain the washer sits flat on the floor. Place the level on the front, the eye, along the back, and along each side to brand certain information technology is completely balanced. If the washer is not placed level, the drum may be knocked out of identify and interfere with regular operation. Once the washing machine is level, lock the adjusting anxiety in place if needed.
With that, you're done! Turn the car on and do a test load to cheque for leaks and to ensure everything is level.
How to Hook A Washing Automobile Upwards to A Sink

Connecting a washing automobile to a sink is a slightly different procedure that may require extra training with each laundry day. The washer should accept a level, open space to sit where information technology can be hands connected to the nearest sink faucet and drain. These set ups require a hose guide to hold the hoses in place when in use, which may be provided by the manufacturer, and additional parts that will have to be purchased separately.
For a sink-connected washer, the sink'southward faucet temperature will make up one's mind the h2o temperature, not the water supply lines. The water supply hose connects to the common cold-h2o connexion at the dorsum of the washer. When connecting the washing automobile to the sink, disconnect the supply hose from the hot water line and purchase a cap to close the hot water connectedness on the dorsum of the washer to prevent potential links.
The cold-water supply line installed into the back of the washer connects to the sink faucet directly. This requires an aerator adaptor on the faucet that provides a threaded connection that attaches to the hose. The faucet adaptor will probable accept to exist purchased separately.
The water supply hose should fit between the washer and the faucet connection without stretching or twisting. If there is any pressure on the hose, buy a longer replacement hose or an boosted extension hose.
In order to set up the washing car for a load of laundry:
- Motion the necessary water supply and drain hoses to the sink surface area, being conscientious non to stress the connections at the dorsum of the washer.
- Connect the water supply line to the faucet adapter at the sink.
- Insert the drain hose into the sink drain securely.
- Make sure all connections are in place and that the washer is plugged into the electrical outlet and ready to use. (Do not let the electrical wiring cantankerous with the h2o hoses!)
- Load the clothes in the washer, fix the water temperature, and turn on the appliance to do a load of laundry!
Dryer Installation
Having mastered learning how to install a washing auto, the dryer is the obvious next footstep. It's always a good idea to check the manufacturer's instructions for any model-specific installation advice and warnings.

- Cheque the Vent.If you lot're replacing an existing electric dryer, the first step is to check that the outside vent is in skilful working condition and completely unobstructed. Clean the vent completely, within and out, to remove any clay or laundry droppings build up. If in that location are any cracks or damage to the vent or exterior vent hood, it's a good idea to replace them.
- Place the Dryer.Move the dryer into place to make sure it is level merely get out enough room to work effectually the back of the dryer. A dryer can be installed within a drain pan, which requires lifting information technology over the border and placing it inside. This is oft recommended for condenser or steamer dryers as a precaution to protect the apparatus or the floor in case of leaks.
- Level the Dryer.Only similar the washer, the dryer must be installed on a flat, level surface. Use the level across the top of the dryer to make sure information technology is balanced. Take care of any high or low sides by adjusting the leveling feet.
- Attach the Vent Hose.Side by side, connect the vent hose to the back of the dryer. For a metal duct, the connecting piece will likely fit easily over the end of the dryer vent hole. The semi-rigid or plastic ducts may require a circular dryer clench to help seal the hose in place.
- Connect the Vent.Adhere the other end of the vent hose to the exterior vent. Use clamps or metal tape in order to seal it securely.
Finally, plug the power cord into the wall. If all connections are secure, movement the dryer into place. Practise not push it against the wall and exist careful non to twist or trap the vent duct or hoses. Turn the dryer on and do a test run to brand certain everything is in working order.
Gas Dryer Installation

With gas dryers, gas burners are used to heat the drum, which can make them more cost effective and energy efficient to use over time. These appliances crave connection to a home'south natural gas or propane line.
Because gas dryers are congenital to employ natural gas, a conversion kit volition exist required for a liquid propane gas line. Follow the manufacturers' instructions for converting the dryer to liquid propane gas. There are specific codes and requirements for the conversion kits, so it'due south best to accept them professionally installed.
Information technology is not possible to convert a gas dryer to an electric dryer or vice versa, and so be conscientious to purchase the correct type of dryer that your laundry room connections will allow. Installing a gas dryer hookup can be an extensive remodeling project considering information technology requires rerouting the home's gas line, if the connection is not already in the laundry room.
Due to the potential problems handling the natural gas or liquid propane connections in the abode, professional installation is recommended for connecting a gas dryer. Many retailers will include installation service options with the buy of a new appliance.
Know where the metal gas close off valve is and that it is in good condition earlier your installation appointment. Most volition exist located straight backside the dryer. Some installers may accept to supercede an older, non-standard shut-off valve to guarantee safe operation of the dryer.
If you have a gas dryer, be sure in that location is a carbon monoxide warning installed nearby. Considering of the potential for dangerous carbon monoxide buildup in the laundry room, a gas dryer requires effective ventilation to the outdoors. The vent for a dryer must be installed correctly and securely, and provide unobstructed access to an open, outdoor area that volition non trap the vented air.
Dryer Cord Installation
Whether buying a new machine or moving a dryer to a new home, the dryer cord must match the electrical outlet where it is installed. The type of power supply string used for a new dryer tin be changed out to make sure that the machine you chose fits the outlet in your laundry room.
If the existing dryer electric cord is in good condition and you lot know information technology meets the necessary condom codes, it can be saved to be used on a new dryer. Practise non reuse a cord if it shows signs of harm, excessive wear, or any fraying.

The pattern of every dryer volition be different, and then always bank check the product manufacturers' instructions. Here are the basics of how to change the dryer cord, step-past-step:
- Be sure the dryer is turned off earlier you unplug the power cord from the electric outlet.
- Move the dryer abroad from the wall and so you have plenty of room to piece of work on the back of the machine.
- Open up the admission panel that the cord is installed into. Be very careful not to lose whatsoever of the pocket-sized screws.
- Take note of where the wires are connected to the terminal cake. The wires volition likely be color coded, such as a neutral white wire, a black wire, and cerise wire, and should be connected one wire to each single terminal. For a four-prong plug, there should besides be a grounding wire, which is likely green. Using tape or other means, mark the order of the cables so that yous know which colour wire connects to which terminal.
- Loosen each of the screws belongings the wires in place and remove the existing cord.
- Remove the cord from the access pigsty in the subclass that holds it in place against the back of the dryer.
- Route the new cord through the access hole in the access panel bracket.
- Attach the neutral wire to the centre neutral terminal earlier attaching the other wires. Tighten the screws over the wire terminals to secure the connection.
- Connect the neutral wire from inside the dryer to the grounding wire from the new cord earlier screwing them downwards with the light-green grounding screw.
- Replace the access panel and screw it into place earlier moving the dryer back into place and plugging information technology in.
In one case everything is reconnected, turn on the dryer and test to exist certain the dryer is working. Changing the string on the dryer is a simple process that shouldn't take more than a one-half an hr to complete.
Of import Considerations for Washer and Dryer Installation

While the install and connexion claw ups for washing machines and dryers may seem uncomplicated and straightforward, there are a whole range of extra considerations that should be planned out earlier the new washer and dryer are brought into the domicile. Determinations like where to put the washer and dryer, what type of power connections are bachelor, and the venting options are all key safety factors to the blazon of washing machine or dryer that will piece of work best for your household. Read on to larn more about to program for these important details.
Where to Install A Washer and Dryer
When determining where to put a new laundry room, or maybe but expanding on the existing one, there are a few things to go along in mind.
Consider the Size

Laundry appliances are big and boxy, usually requiring two people to safely move and place into the laundry room. They can weigh anywhere from 100 to 300 pounds, depending on the type and features built in. Keep that in heed when you make your purchases, because it may take extra assist to get a washer and dryer upward to a second-floor laundry room, or even downwardly to the basement hookups.
E'er mensurate your habitation laundry area completely. The dimensions for washers and dryers are not standard and will vary. Even when replacing an older machine for a new 1 that is the same manufacturer and model, the measurements may have changed in the years since the terminal 1 was purchased, so it is not a guaranteed fit.
When planning your washer and dryer installation, remember that any maintenance work will require easy access to the back panels of the machines. Suit the appliances so they tin exist easily moved in and out of the space. If space allows, program a laundry room layout that provides enough room for someone to work safely in the space open between the appliances and the wall.
It's important to measure the expanse alee of the washer and dryer installation to be sure they volition fit. Program to add in up to every bit much as 6 inches of space behind the units to allow for room to connect to power, gas, and water lines. Include in the measurements whatsoever overhead countertops or cabinets that may be in the way of the machines themselves, or that interfere with opening the washer or dryer doors or reaching the control panel. The direction of the door swing on some machines may exist reversible to help them fit into your laundry surface area.
Venting Requirements

The dryer vent is designed to miscarry lint and moisture. If the exterior vent is as well far away and the air flow is too weak to button information technology exterior, dryer lint can clog and block the duct. Most vented dryers require efficient ducts or vent hoses connecting to outdoor spaces, which means usually cut a hole in an exterior wall or adding a specific vent for a dryer upwards through the roof. Gas dryers are especially of import to have properly vented, as the natural gas used to warm the tumbler that dries the clothes can exist unsafe if information technology leaks into the firm.
The dryer vent location will depend on the layout of your home. Program the location of the dryer to keep the ducting equally short every bit possible. Go on in mind that a longer duct, or one with multiple bends and angles in the pipe, interferes with the air pressure coming from the dryer.
The exterior vent must be placed somewhere that is easily checked for maintenance issues and cleaning. If anything blocks the vent, such as lint, or in some cases wildlife nests, they need to be promptly cleaned out to avert dangerous carbon monoxide buildup in the firm or the potential for fire from the trapped rut. Employ vent covers, such as a louvered vent or a vent hood, to help go on the vent clear of obstructions.
For apartments and other homes with small-space laundry rooms that don't allow for exterior vents, look for ventless dryers, likewise known as condenser dryers. These electric dryers recycle the air through a filtration system before allowing it back out into the laundry room, reducing the amount of wet in the air. Condenser dryers remove the water from the air, and it is then either drained out through the drainpipe or collected in a tray that must be emptied at the end of each cycle. They don't get as hot every bit a vented dryer and are gentler on wearing apparel.
When installing a washer and dryer in a closet or other enclosed space, the doors in forepart of the machines must have open up ventilation, either with a vent register on the top and bottom of the doors, or with louvered doors that let gratuitous airflow. Due to the smaller, bars infinite of a closet, make sure that in that location are no boosted fuel-burning appliances installed in the same area to avert carbon monoxide buildup. Information technology is important that the area around the washer and dryer have adequate air flow.
Connection Requirements

A washing machine installation requires access to both a ready water supply and the necessary plumbing for effective draining. They may fit in dedicated laundry rooms, bathrooms, basements, or garages. Washer and dryer sets tin can even exist installed in closets, providing they have a shared wall with the plumbing lines of perhaps a kitchen or bath, electrical outlets, and enough space and access for proper ventilation for the dryer.
If installing plumbing isn't a home comeback projection that you're comfy doing yourself, phone call in the professionals. New washer and dryer hookup installation requires opening up the walls, floors, and the existing plumbing lines to add in extra drains, connecting valves, and to reroute pipe. It also may require installing new electrical outlets and connecting additional wiring into the new laundry room.
These are complicated projects that may involve local edifice codes, depending on the size of the new room or other factors. Consult with local contractors or plumbers before adding new washing motorcar hookups.
It Should Fit the Household

The rumble of even the quietest laundry drums can interfere with enjoying TV in the den, so role of whatsoever washer and dryer installation is to make certain to plan for the day-to-solar day inconveniences, too. When determining where to install a washer and dryer, consider the noise, and of course the potential for water messes or fifty-fifty flooding if the washing automobile drain hose isn't secured properly or some other damage occurs.
Whenever possible, the appliances should be installed in a separate area from other daily dwelling-activities to help insulate against the sounds from the different cycles. A water-resistant or water-proof flooring makes it easier to clean up spills and protects the floor in case of leaks. To reduce both noise and potential impairment from leaks, the floor must be level to minimize rattling and "walking" when the appliances spin unbalanced. If necessary, in that location are leveling, anti-vibration pads bachelor to right the problem.
A popular alternative for an in-dwelling house laundry room is to place the washer and dryer in the garage or some other outdoor, enclosed building. These are oft concrete or unfinished floors, and then keep in mind that a washer and dryer placed on bare concrete should have at least 18" of space betwixt the appliance and the flooring to ensure proper ventilation, abroad from potential chemical spills on the ground. Many chemicals used in the garage are highly flammable and these fumes combined with the oestrus from a dryer could lead to explosions or burn down. For these installations, wait for a laundry pedestal.
For boosted tips on what to look for when ownership a new washer or dryer, or ideas to help programme the perfect laundry room, we've got you covered. Cheque out our acme tips on how to make your laundry room piece of work for you.
Power Sources for Washing Machines and Dryers

A washer and dryer ready may require either a 120-volt grounded outlet, which is the standard home electrical outlet, or a 240-volt outlet. Make sure you know the connexion blazon available in your laundry room before you have the machine delivered or installed, to ensure the correct cord type is included.
Most washing machines will feature the 120-volt plug that can plug into standard abode electrical outlets. Dryers, however, volition likely require a 240 plug, even if it is a gas dryer. (Electrical power is required to run both electric and gas dryers.) Brand sure that both the washer and dryer are shut enough for the cord to easily achieve the outlet and do not employ extension cords for the appliances.
A 220/240-volt plug is either a 3 or 4 prong plug, which await very dissimilar and are non interchangeable. Determining which type of cord is needed for the machine volition partly depend on the age of the home or electric installation. The standard 240 connexion for homes built afterwards 1996 in the Usa will exist an over-sized 4-prong plug.
Required Features of Your Washer and Dryer Setup

The washing machine requires hoses, the floor should be properly protected, and the dryer must be properly vented. Hither's the basics on what you demand to know about your laundry room's most important accessories.
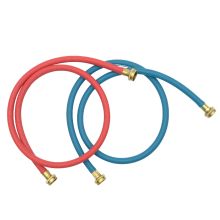
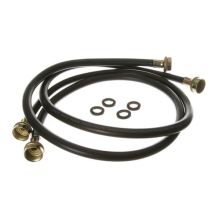
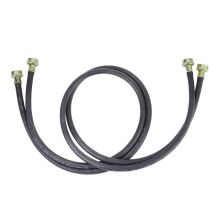
Are Washer Hoses Standard?
Starting at $12.69
Starting at $12.00
Starting at $13.34
There are multiple hoses required to consummate your washing machine installation: two water supply washer hoses and a drain hose. Not only are there dissimilar hoses for different jobs, there is some multifariousness in the types of hoses bachelor. The washer hose does not come standard with the unit and yous should choose the type of hose that fits your budget and laundry setup. Yous should besides replace washer hoses equally needed to prevent leaks and to extend the life of the washer.
For the water supply hoses, which connect the h2o from the home plumbing to provide the hot and common cold water for a load of laundry, there are three types of hoses. The first pick is a standardrubber hose, though these are not recommended equally they are prone to leaks or long-term harm that can result in flare-up hoses and laundry room floods.
If the washer and dryer installation will be outdoors, areinforced safe hose can be used for the washer's water supply. Reinforced prophylactic hoses have a rayon or polyester mesh lining around the rubber hose that helps protect against damage from water pressure, but they are not as effective every bit steel-braided hoses and are non recommended for indoor installations. Though these reinforced hoses can be used for a shed or garage laundry room, a standard garden hose should not be used as a washer hose.
The manufacture standard and recommended washer hose is thebraided stainless-steel hose, which is a rubber-lined hose with a steel-braided outer beat that helps reinforce the hose against the amount of h2o force per unit area that is sent through the line. This helps prevent bursting hoses and leaks. Some of these hoses have a connector which can notice the h2o pressure changes and stop the water menses entirely to help foreclose water damage to the laundry room.
The other type of hose needed for washer installation is the washerdrain hose. A universal bleed hose connects to the washing machine outlet at 1 end, with a U-shaped curve in the reverse finish that is designed to hook into the drain standpipe that connects to the home plumbing. The drain hose should exist checked as part of regular maintenance on the washer, ensuring that the hose is secured in the standpipe and connected appropriately to the washer in order to handle the h2o pressure of the washing motorcar emptying the water from the laundry load. A standpipe hose grip can assist continue the hose in place within the standpipe.
During washer and dryer installation, e'er exit the washer hoses enough room to connect to the automobile without abrupt bends or twists in the line, usually a minimum of 4" space between the washer and the wall. Washing machine hoses should be checked for leaks yearly. Replace them if there are any signs of rust, fraying and wear, or in the case of a leak. A high-quality washer hose can last reliably upwards to 5 years.
Does a Washing Machine Require a Drain Pan?

A washing machine load uses a large amount of water, creating a potential hazard zone in the laundry room in case of a leak. A washing automobile drain pan is a metallic or durable plastic base with raised outer edges that the washer and dryer can exist placed in to contain any water from the appliances. Information technology is an actress stride you can have to protect your floors against the chance of leaks or flooding from the washing machine or steamer dryer.
The bleed pan is particularly of import if you're installing a washer on an upper floor, where a drain overflow, machine maintenance issue, or leaking hose can cause damage to the ceiling and walls of the room below. They besides help with general problems, like accidental spills and condensation, in the laundry room. They tin prevent h2o damage to the floors, trim, and walls, and are a relatively inexpensive solution. Some building codes at present require drain overflow pans, so check with your plumber or a local contractor for a new build.
Washing Machine Drain Pan Installation
It can be helpful to install the drain pans prior to installing the washer and dryer, as the appliances must be lifted over the edge of the bleed pan, which requires they be unplugged and disconnected from any water supply or drain lines.
A high-quality drain pan is made of durable plastic or metal and will have a raised border all effectually that traps the water to keep it off the floor. The washing auto and dryer units should fit inside the drain pans completely, with a few inches to spare all around the appliances. Some drain pans may be large plenty to hold both a washer and dryer in a single pan. Drain pans tin exist glued into place confronting the drywall and subfloor of a new build, or they can rest on top of the flooring.
Drain pans may require cutting a drain hole in the lesser to fit over the flooring drain, or they may include a cutout in the side that can be connected to a drain hose, depending on the materials and pan type you cull. Always check the installation instructions that fit the drain pan you choose. The pan should connect to the drainpipe, either directly via a bottom-drain fitting, or with a brusque length of hose to permit a side-fitting outlet to direct the overflow to the drain.
With a lesser-drain pan, marking the location of the bleed nether the pan and cut or punch-out the hole to identify the drain, so connect it to the laundry room floor drain. This may require cutting the drainpipe that comes up from the floor, so that it rests beneath the level of the subfloor and the pan drain fitting tin can secure to information technology while remaining level. Be sure to secure drain fixtures with the advisable glue for the material blazon and employ caulking effectually the edges to create a watertight seal.
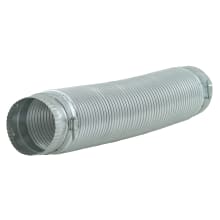
What is a Dryer Vent For?

Starting at $42.80
Starting at $10.68

Starting at $49.99
A dryer uses motion and heated air to dry a load of dress. The dryer vent is needed to safely get rid of the moisture that builds up inside the drum. It removes excess heat from the dryer itself to keep it from overheating, ensuring the washer and dryer stay in working condition longer. It protects the house and household from the dangers of loftier humidity, which can lead to issues like mold growth and h2o damage in the walls and floors, or even health issues.
A dryer vent and duct arrangement should always be installed carefully when installing a gas dryer. Gas dryers are connected to the dwelling house'due south gas line and so must likewise remove any remaining carbon monoxide in improver to the heat and wet. They must exist vented outside into an open up space with plenty of airflow in order to forbid dangerous buildup indoors or even inside the duct itself.
When it comes to how to install dryer vent ducting or hoses, in that location are multiple options for the types of vent hoses or connections you can cull from. Most dryer ducts will be 4" broad pipe or hoses, bachelor in varying lengths upward to eight feet, and will be designed to clamp into place. Check local codes and the dryer manufacturer's installation requirements to determine the best fit for your laundry room.
Options for transition ducts include:
- Rigid metal duct pipe, a smooth-surfaced pipe that tin run from the outside vent to the dryer connection without obstruction.
- Semi-rigid metallic duct, a flexible and durable duct with a smooth interior, usually made of either aluminum or galvanized steel.
- Aluminum foil duct, made of a flexible, piano accordion foil that clamps into place between the dryer and the outside wall vent. Because of the ridges and the more fragile nature of the foil, the tubing should exist maintained and cleaned out regularly.
- Plastic duct, ordinarily made of vinyl, is a fully flexible vent hose with ribbed construction. Check local edifice codes equally these are often not allowed due to the potential burn down adventure created by trapped oestrus and lint debris within the thin plastic tubing.
For small-space laundry rooms with the dryer vent placed shut to the dryer itself,slim ducts are available that offering a direct connexion to the vent without the need for the curled hoses and long pipes. Slim ducts employ the same, standard 4" connections, but they have a flat, rectangular air duct rather than the round hose. The slim duct adjusts from nearly 27" to 48" in length, allowing it to telescope to fit the required altitude between the dryer connection and the exterior vent.
For gas dryers and for other vented dryers placed more than 8 feet away from the outside vent connection, it'south recommended to use a rigid metallic duct pipage, as the smoothen duct allows greater airflow and has fewer surfaces to catch lint and trap estrus. Rigid metal ducts can be used for curtained installations within walls or flooring and tin can be arranged with elbow piece fittings to directly the pipe.
When choosing a vent duct, make certain that production is certified every bit safe past a national testing laboratory and meets all necessary building codes. The hoses and ducts tin be installed using round clamps to make for easier maintenance, or for rigid ducts, apply metallic duct record at the connection points; never screw or boom into the ducts as this creates extra air holes that collect lint and can be hazardous over time.
How to Install Dryer Vents
One of the more than intimidating tasks when learning how to install a washer and dryer is installing the dryer vent. It doesn't take a lot of time, simply it does involve careful planning, every bit well equally making permanent changes to your home'due south exterior, and can require the use of specialized tools.
Dryer vent installation requires drilling a 4" hole through the outside wall of the home, whether the wall is standard siding, solid brick, or stucco. It must vent to an outside surface area with plenty of airflow. The exterior vent should be a minimum of 12" off the ground on the outside of the home to avoid trapped air or debris clogs.
This may mean cut through the wall directly behind the washer and dryer, or it tin require extending a rigid, metal vent duct as much as 20' to 25' up a basement wall in lodge to attain an outside wall. To minimize airflow loss over a larger area, it's best to apply a rigid metal vent duct and connect direct to an exterior wall vent hole. Tape the connexion joints with metal foil tape to keep them sealed.
A new vent installation involves using a stud finder to make certain the location doesn't drill through a framing stud and helps to steer articulate of interference with electrical or plumbing lines. Cut a hole for a dryer vent tin can exist washed with an electric drill, jig saw, or a skill saw, using the correct rounded saw bits. Once the hole is cut, the duct is connected to a vent mounting block and cap to help protect the duct.
With a dwelling improvement project such every bit how to install a dryer vent, there is not a lot of room for mistake. In that location are multiple codes and regulations that aid ensure rubber dryer venting. The vent must be installed properly to aid protect the household from carbon monoxide and moisture damage. It's a skilful idea to consult with your contractor to make certain it is done correctly and upward to lawmaking on the first attempt.
Washer and Dryer Stacking Kits

Starting at $35.00
Starting at $41.59

Starting at $58.95
Washer and dryer installation tin can become complicated in smaller spaces. With some forepart loading washers, information technology is possible to buy a stacking kit that allows the dryer to be mounted to the top of the washer to save space. Because of the differences between brands and model designs, stacking kits are not universal and should be purchased to match the washer and dryer brand.
If yous're planning to stack the washer and dryer, it's best to purchase from the same brand and model series if possible, to make sure the design sizes are compatible. For easier daily utilize, brand sure both units are forepart-loading and that the controls are placed at the front edge above the doors. A stacked dryer will still require proper venting connections and space at the back of the unit.
Keep in listen that a dryer can counterbalance up between 150 to 200 lbs. But stack a dryer on a washer with help from others and the proper safety equipment, such as furniture movers or lifting straps. The washing machine should e'er be the base when stacking a washer and dryer, due to the added weight of the water with a load of laundry. Most washer pedestals will not work with stacked models due to the weight of the combined units, and they brand information technology more than difficult to achieve the dryer controls.
The stacking kit consists of mounting brackets that are screwed into place along reinforced sections of the appliances to secure the stackable washer and dryer together. These keep the ii appliances balanced and assist prevent the dryer from "walking" off the flat elevation. The stacking kits must be mounted prior to washer and dryer installation to make certain the appliances are secure before being moved into place.

Always select a stacking kit from the same manufacturer every bit the stackable washers. Consult the manufacturer's instructions for how to install a washer and dryer using a stacking kit to ensure the correct mounting locations and connecting pieces. Making "practice information technology yourself" stacking kits can void the warranty on your washer and dryer.
Once the appliances are secured together, they can be moved equally needed for normal dryer and washing machine installation steps. After connecting the hoses, ducts, and power cords between the machines and the wall, movement the 2 appliances into place before testing the machines.
0 Response to "Hardware for Closewasher Hot and Cold Water Hookup at Kitchen Sink"
Post a Comment